
Volvo 240 1UZ Swap Information

Volvo 240 1UZ Swap
This article is full of information about the 1UZ-FE engine and “tips and tricks” regarding installing this engine in a Volvo 240. LucaCarMods has developed several parts to make performing this engine swap easier, and we are doing our best to add more products to this offering in the future.

1.0 Information regarding the 1UZ-FE
The 1UZ-FE engine is a 4.0L V8 engine designed by Toyota/Lexus and is found in cars such as the Lexus LS400. There are several types of 1UZ-FE engines, each with its advantages and disadvantages.
1.1 1st gen 1UZ-FE
Our swap kit is designed on the 1UZ-FE1st generation with a 340e automatic transmission. The reason why many people choose the1st generation 1UZ-FE engine is because it has the thickest connecting rods of all the generations. The advantage of this is that at a later stage it is possible to fit a turbocharger and increase power considerably. The downside to this engine, however, is that it has the least power in atmospheric form.
Power: 245hp
Advantages: Thicker connecting rods.
Disadvantages: Least power
1.2 2nd gen 1UZ-FE
The2nd generation 1UZ is almost identical to the1st generation in appearance and installation options. However, it has already received a nice power increase to a whopping 265hp. This engine has the thinner connecting rods, making it less suitable for a turbo conversion.
Power: 265hp
Advantages: More power than the1st generation
Disadvantages: Thinner connecting rods
1.3 1UZ-FE VVTi
If you want to keep driving atmospheric then the VVTi engine is definitely recommended! It produces as much as 290-300hp and also has more torque down low due to the VVT and variable intake length.
Keep in mind that all 1UZ-FE VVTi ECUs come with an immobilizer. Also, should you go on the original ecu, always ask for the RFID reader, amplifier and key so you can start the engine without any problems.
Power: 290hp
Advantages: Most powerful 1UZ motor
Disadvantages: Thinner connecting rods and immobilizer.
Of course, there is much more information on the Internet regarding the 1UZ-FE engines. In a nutshell, these are the key items so you can make a good choice as to which is best suited for your engine conversion.
2.0 LucaCarMods 1UZ-FE Swap kit for a Volvo 240
At the time of writing (3-2022), our swap kit to equip the Volvo 240 with a 1UZ engine consists of the following items:
- Engine mounts
- Bak support for lexus 340e automatic transmission
- Throttle cable adapter kit
- GPS Speedometer adapter
- Fan Shroud Kit (new product 03-2022)
- SHIFT CABLE HUB – AUTOMATBAK 340E – B&M RATCHET SHIFTER (new product 03-2022)
The plan is to expand this to more components in the future to ensure that the swap becomes more and more plug and play.
2.1 Important: Which 1UZ-FE and Volvo 240 are our parts based on and where do they fit (3-2022 kit)
LCM has developed the 1UZ-FE Volvo 240 swap kit on the following setup:
- Volvo 245 1975 LHD
- Without power steering
- Thin/small brake booster
- 1UZ-FE 2nd gen
That is, the parts we have developed will fit this combination anyway. Through customer feedback, we have now been able to create a nice overview of the compatibility of our products.
2.1.1 Engine mounts fit:
- 1UZ Volvo 242, 244, 245 LHD without power steering with small brake booster
- 1UZ / 3UZ – Volvo 242, 244, 245 RHD with power steering with small brake booster
On a left-hand drive 1UZ Volvo 240, the engine mounts need to be modified to give room for the steering box banjo bolts. So it can be made to fit by taking a small bite out of the engine mounts with the grinder.
2.1.2 340e automatic transmission support fits:
The Lexus 340e automatic transmission for as far as we know on all 1UZ/3UZ and Volvo LHD/RHD combinations. We did learn that on certain combinations, the bolt holes for attachment to the chassis on the support need to be made very slightly larger.
2.1.3 Throttle cable adapter kit fits:
This adapter kit can be used on the2nd generation 1UZ engine.

On the1st generation 1UZ engine, we had to mount the throttle cable on the other side but used the adapter bracket to mount the throttle spring.
However, the throttle cable from this kit can be used with some modifications to the original 1UZ throttle cable bracket.
2.1.4 GPS Speedometer adapter
The adapter plate to mount a GPS speedometer from Alibaba is only suitable for the1st generation counter clocks of a Volvo 240. You can easily check this by looking at the rear to see if the original speedometer can be detached.

2.2 Wiring Phoenix Engine Management
An important aspect of any engine swap is the wiring. When wiring, we always choose to use the wiring harness that comes with the engine incl. send the ECU to Phoenix Engine Management in the United Kingdom. They specialize in making Plug and Play wiring harnesses for a 1UZ using the original ECU. If required, they can also make a wiring harness for a standalone ECU.
The reason we choose to work with this wiring harness supplier is that we are supplied with a wiring harness with some loose wires that need to be connected to the Volvo 240. Consider: switched plus, constant plus, charge current control light, engine malfunction light, reverse lights, etc.
In short you get a very neat wiring harness that is easy to connect.

3.0 Convert a Volvo 240 to a 1UZ-FE Volvo 240!
Now that the general information regarding the 1UZ-FE engine and LCM parts is known, we will go into the content of performing the swap.
For each section, details, information such as wire diagrams, important facts and tips will be listed. So this is not a manual, nor are the chapters always in chronological order.
3.1 Preparations on the 1UZ-FE
3.1.1 The correct timing belt for a 1UZ-FE without AC and PS
Should you have made the choice to remove both the A/C (AC) and power steering (PS) from the engine, a specific timing belt will need to be installed for the alternator. Instead of using an expensive adapter kit, you can use the following stretch belt for this purpose:

This is a GATES K060283SF stretch belt multibelt. Please note that you order special tools for fitting stretch belts with it. If you do not do this then there is a very good chance that the multi-rib belt will tear.
3.1.2 Disassembling the viscofan
The first generation 1UZ engines are equipped with a visco fan. Because of the use of space and the fact that the visco fan snuffs out quite a bit of power, you can disassemble it. There is information in several places that the fan is connected to the water pump, which is not the case. The visco fan can just be disassembled.
We welded in an aluminum plate for appearance.
3.2 Getting the Volvo 240’s fuel system ready for the 1UZ-FE
The standard fuel supply of a Volvo 240 can be mechanical or with 2 electric fuel pumps. In either case, it is necessary to remove the original system (except the return line) and install a new fuel system.
3.2.1 In-line fuel pump or in-tank fuel pump
That a larger fuel pump needs to be installed is logical, the 4 liter V8 engine requires quite a bit more fuel under full load than the 2.3 liter 4 cylinder that often comes standard.
You can fit either an in-line pump under the car for the Volvo 240 as a main fuel pump like the Bosch 044 or an in-tank pump like a Walbro 255L.
When mounting an in-line pump under the car, I recommend adjusting the suction tube in the tank so that it has the proper suction height. A pre-filter for the pump should also be placed in the suction line.
Mounting an in-tank pump speaks for itself.
Which one is preferred that you can decide for yourself. An external pump is easier to get to and the internal pump is often quieter.
3.2.2 Fuel rail connections
The Volvo 240 has a fuel system with a return line, the1st and2nd generation UZ engines also have this. This allows you to reuse the return line from the Volvo 240 by connecting it under the hood to the fuel rail of the 1UZ engine.
On an LHD Volvo with the engine mounted, on the driver side the fuel rail supply side is on the 1UZ and on the passenger side is the return line.

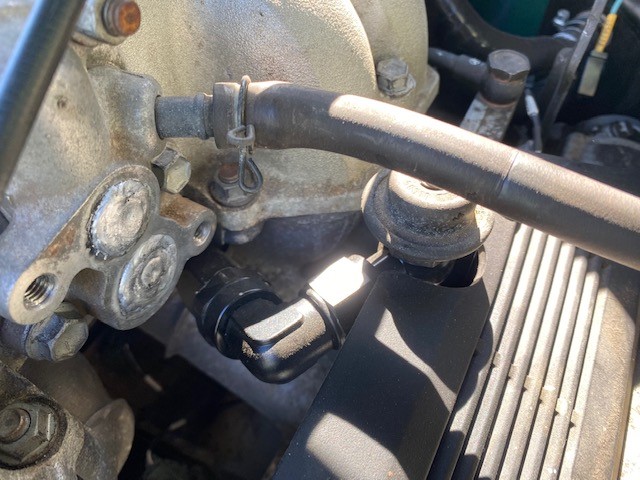
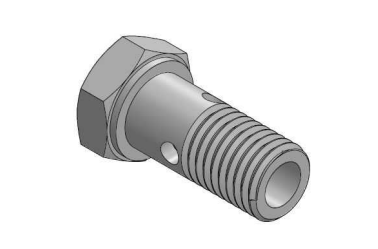
To fit both connections with Banjo connectors, you will need 2x M12x1.25 hollow bolts (if you do not wish to use the original fuel pressure regulator) and 2x M12 banjos in the desired hose diameter.

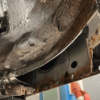
3.3 Crankcase modifications
As mentioned earlier, the sump pan needs to be modified to allow for mounting the 1UZ-FE.
Modifying a front sump sump pan as shown below allows the engine to get past the steering box and stabilizer bar. Because the crankcase is so far forward you will also have to modify that oil suction tube.


We have fitted this sump pan with 2 additional baffles that should reduce the amount of engine oil going back and forth during cornering. At the top of the sump pan, you will also have to fabricate your own dipstick because the original one will be discontinued.
Shortening an old dipstick from, say, a mazda MX-5 and reusing it works very well.

3.4 Small brake booster
The 1UZ is quite a wide engine, because of this the valve cover comes in contact with the brake booster when using a new type (thick) brake booster. Using the original old type (narrow) brake booster from Volvo gives you about 2cm of clearance to the 1UZ valve cover.

3.5 Exhaust manifolds
Several types of exhaust manifolds were supplied for the 1UZ engine. On the passenger side, any manifold will fit but on the driver side, the steering rod is in the way.
So far, we have found that the (2nd gen) 1995 1UZ-FE steel manifolds from an LS400 can be fit on either side. By marking the manifold where it comes in contact with the steering rod and then “massaging” it there with a good mallet, it can also be fit.
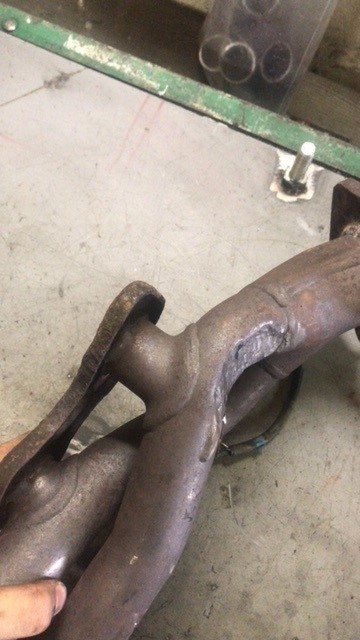
Which definitely do not fit are the 1994 (1st gen) 1UZ-FE LS400 manifolds….
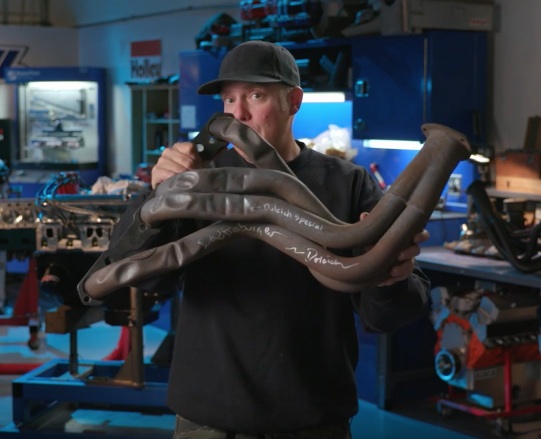
Should you prefer not to dent your manifolds, the only other option is to make custom manifolds.
By the way, at Engine Masters they did a nice test on how much denting a manifold saves, the difference was negligible. Unfortunately, the video has since been taken offline (probably due to video rights). But below is the photo and link to the article:
https://bangshift.com/general-news/videos/after-getting-bashed-in-the-comments-for-the-header-bash-episode-engine-masters-takes-a-second-swing-at-the-dented-headers-myth/
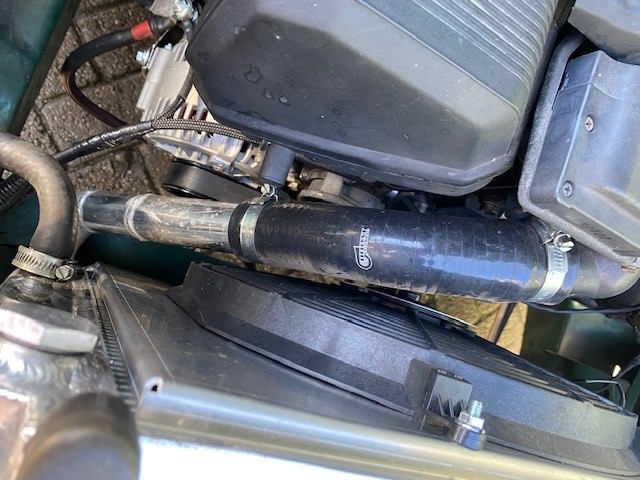
3.6 Radiator and cooling system
3.6.1 Format of coolant connections
The coolant connections on the 1UZ-FE engine are 38mm in diameter, the Volvo connections on the radiator are 32mm. The best solution is to take an aluminum Volvo 240 radiator and weld aluminum bends onto it so you only have to use 1 silicone coupler per side. Also, you can then go from the radiator directly to 38mm without a silicone reducer.

3.6.2 Using Lexus 1UZ-FE Coolant Temperature Sensor with the Volvo 240 instrument panel
Normally you would reuse the Volvo 240 coolant temperature sensor in a swap because the 1UZ sensor and the one from the 240 give different readings.
Someone else who did the same swap found out after much trial and error that you can use the original 1UZ coolant temperature sensor combined with a 33 ohm resistor. *At the time of writing, we have not tested this ourselves*
3.6.3 DO88 Volvo 240 Radiator conversion to electric fan with an LCM Fan Shroud Kit
With our fan shroud kit, you can easily mount a 356mm Mishimoto Slim Fan on the radiator. You slide the bottom of the shroud into the slots and above you drill 3 3mm holes yourself and then attach everything with bolts and lock nuts.
The reason you need to secure the holes yourself is that there can be slight differences in do88 radiators.


3.6.4 Electric fan control with the Mishimoto Fan Controller kit
By removing the visco fan you will have to switch to an electric cooling fan for the radiator. If you connect it directly with a relay and switch then you will always have to monitor the temperature yourself….
Much easier and safer is the Mishimoto Fan Controller kit. This kit allows you to control an electric cooling fan using the included coolant temperature sensor and control unit. On this control unit, you set the desired temperature when the cooling fan will turn on.
The included sensor has a 1/8 NPT thread.
3.7 Wiring
The wiring connection with the Phoenix Engine Management manual largely speaks for itself; you can tap the switched plus from the ignition switch (measuring is knowing), ditto for the start signal and other basic connections. Here, therefore, I will not elaborate further.
Some other things are important, though.
3.7.1 Inserting diodes or LED control lights
Replace all the indicator lights you are going to connect such as the charge control, engine failure light and any other T5 lights for LED versions (to be ordered on our webshop) or place a Diode between them. The most important one here is the charge current control light.
If you don’t do this then 12V can go back into the ECU, keep it energized, preventing you from turning off the engine with the ignition switch. The only solution then is to disconnect the battery terminal. A diode allows current to flow in only 1 direction.
3.7.2 Instrument panel wiring
In the instrument panel, there are a number of things you probably would like to connect:
- Engine malfunction light
- Oil pressure
- Charge current light
- Tachometer
From Phoenix Engine Management, you will receive a file detailing what signal to expect on a wire. See photo below.

- You can connect the wire from pin 1 directly to the 1-pole terminal behind the tachometer. This is because the 8 cylinder engine gives a 4 cylinder RPM signal.
- Go to https://www.240turbo.com/240gaugewiring.html and find the appropriate instrument panel to go with it. Here you will encounter a picture like the one below:

Since most old Volvo 240s do not have an engine malfunction light, you can use the Choke Lamp. This colors orange and shows CH which can be interpreted as CHECK.
So in this case, you connect the wire from CEL/MIL wire to connector 32, pin 3.
- Water temp is again quite simple, you can connect it to plug 31, pin 10. (always check the website to see if this is correct for your year of manufacture)
- Chargelight can be connected to connector 31, pin 4. Do always check that connector 31, pin 9 is actually getting 12V to ensure that the charge current light will work. (always check the website to see if this is correct for your year of manufacture)
- Oil Light can be connected to connector 31, pin 11. (always check the website to see if this is correct for your year of manufacture)
Instead of cutting off all the connectors and then soldering the wires, you can use completely new terminals. This makes for a much tighter finish.
The appropriate terminals can be ordered here: https: //www.rdae.nl/3-1160-female-kontakt-rond.html

3.7.3 Brake light signal for the automatic gearbox
The automatic transmission needs to know when you press the brake pedal. If you don’t connect this then the motor may start to push while you are braking.

The brake light signal can be provided by branching off from your brake switch or the control relay which controls the operation of the lights.
Below is a wiring diagram of the round control module which is located at the bottom of the steering wheel. With a multimeter, you can easily find the 12V signal here when the brakes are applied.

*Always check that this diagram is correct for your Volvo’s year of manufacture.
3.7.4 Reverse switch and lighting
The Volvo 240 with automatic transmission has a reverse switch which is mounted at/in the automatic lever. Disassemble the auto lever/switch and use its wiring to connect the reverse lights.

3.7.5 1UZ Ignition modules neatly concealed and grounded
The 1UZ has 2 ignition modules, they must be grounded when mounted with the housing. An ideal place to neatly conceal these is against the bulkhead with blind rivet nuts.

We use M6 blind rivet nuts combined with M6x30 socket head bolts for mounting the ignition modules. With this, they are neatly concealed and the housing also has a ground point.
3.8 Automatic gear lever
The Volvo 240 automatic shifter can be replaced with a B&M 80842 – B&M Pro Ratchet Shifters which can be ordered at Summit racing, for example.

This shifter is not completely plug and play but it is one of the better solutions for controlling the Lexus automatic transmission.
Mounting the shifter itself I am not going to explain in detail, there are some things important to know.
- To mount the cable to the automatic transmission, one of the brackets provided must be modified.
- The gear selector lever which is on the side of the gearbox must be rotated 180 degrees so that it points down.
- Most importantly, the lever on the bucket, has a center to center hole length of 57mm. (always check this yourself with the calculation below the photos)
- Always index the auto lever in neutral. In fact, the stroke from R to P is longer than the others on the 340e automatic transmission.

Below you will find the calculation to calculate the length of the 340e automatic gearbox arm yourself.
Source : https://www.lextreme.com/forums/threads/1uzfe-auto-box-convert-to-cable-shift-link.10007
– Measure the arc the selector on the gearbox takes from Park to 1st (The a341e goes through 60 degrees).
– Measure the Amount of cable pulled by the shifter from Park to 1st (The outlaw was somewhere around 50mm… I can’t remember exactly)
– Using a bit of maths the formula was as follows:
Arm Length = ((360 / Selector Arc) * Cable Pull) / ( 2 * PI)
Basically I’m working out the radius of a circle, using the length of part of the circumference.
So my formula was:
Arm Length = ((360 / 60) * 50) / ( 2 * PI)
Arm Length = 47.75mm
IMPORTANT: The values I’ve plugged in here are from memory. MEASURE YOURS FIRST!
3.8.1 Bracket for the B&M shift cable
The bracket pictured below is a custom B&M bracket to mount the shift cable to the 340e automatic transmission. We converted this bracket into a 3D CAD drawing so it could be laser cut.
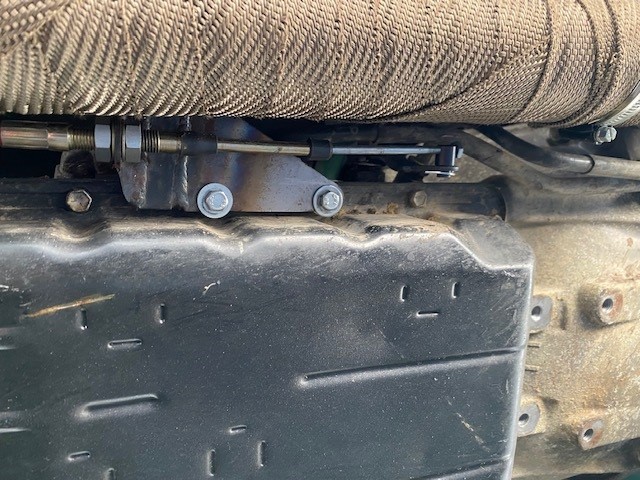

Our bracket can be found under the heading Volvo 240 1UZ swap or by clicking here.
To be continued
If we run into other issues or receive questions from customers they will also be incorporated into this article.
If you have any questions about this swap or our products, feel free to send us an email using the contact form.

Over ons
Copyright © 2024 LucaCarMods met liefde gemaakt door RdV
